Log something crazy, but intresting.

Convert Image to WebP and Vice Versa
Date:
WebP is an image format developed by Google and was announced in 2010 but the first stable version came out in 2018. That is not very old but recently I see a lot of sites shifting from traditional formats of JPEG, PNG and GIF. The main benefits of the shift are the reduced data size without losing quality and reduced load time of the website.
These days our cameras are capable of taking high-resolution pictures which also means the size of a picture is at least 5MB. If you put 10 of these images on the webpage then a total of 50MB of download will happen when you view them. The speed of opening these images will also depend on the bandwidth of your internet connection.
If the load time of the page is more than 3 seconds then the user loses interest and leaves the site. That will have an impact on your SEO ranking and search engine do punish sites that have longer load times.
To overcome this we resize and optimize the images. A large population uses JPEG and PNG but here you do lose on the quality. There is a better solution which is WebP which is lossless image compression.
WebP is open-source and you can convert images to WebP or WebP to JPEG or WebP to PNG on your own computer without compromising your privacy by using online converter tools.
Download WebP repository
First, visit Google's official WebP repository and download the latest version, I am using windows so I will download the zip file libwebp-1.2.4-windows-x64.zip. I will unzip the content to my C drive. This folder contains all the required files and you don't need to install any of the applications. Its process is similar to how you install HUGO prebuilt binary.
Add WebP repository to PATH
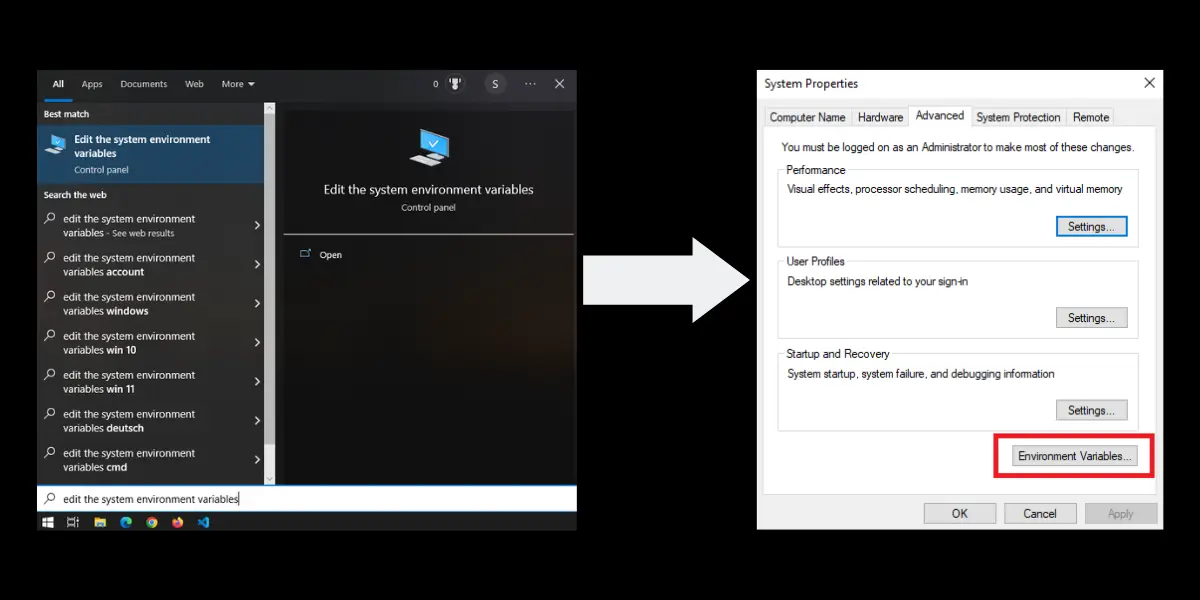
Open Advance System Settings, there are plenty of ways to do this below are 3 ways to do it.
The first way, One press the windows key and type Advance System Settings.
The second way, open This PC in the File Explorer and right-click select properties and on the opened window on the left side you will see advance system settings.
The third way, press the window key and select settings then System>About on the left-hand side under Related settings you will find Advance system settings.

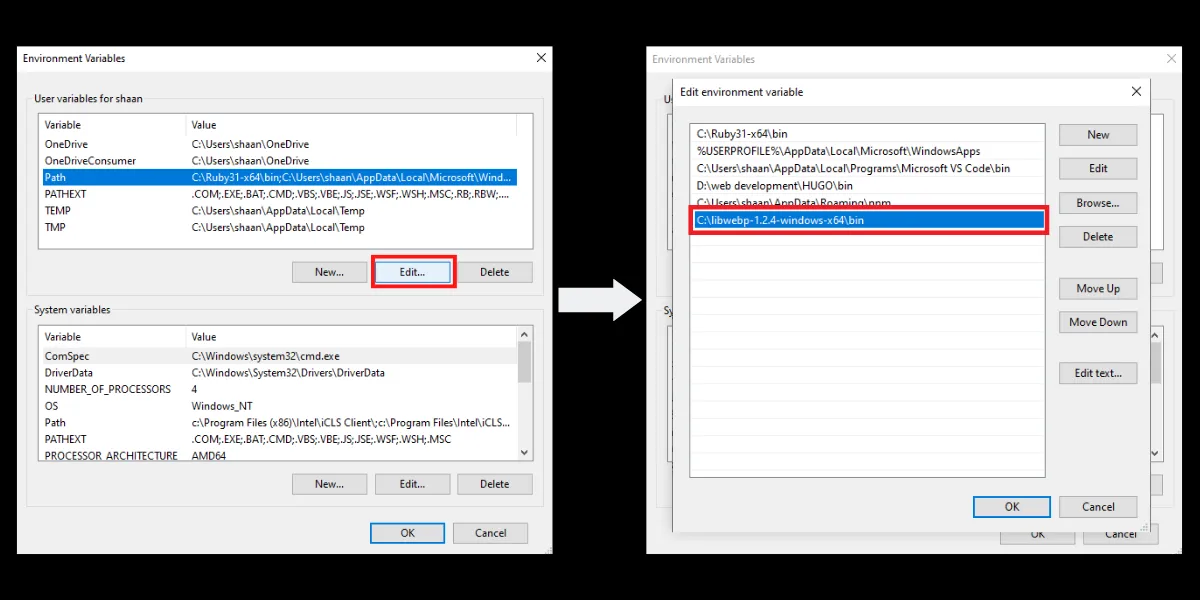
Once you are in the advance tab select Environment Variables, select Path and press Edit and add the path to the bin folder where the zip file is unzipped.

Press Ok to confirm
By doing this you are allowing the WebP binary to run without being in the same directory.
Check if the PATH is added correctly
Press (windows key + R) and type CMD this will open the command line type cwebp -version this should give out the version number that you have installed. If it does you have completed the installation correctly.
Convert Images to WebP
Now that you have done the installation you can convert the images to WebP by typing the command on the command line
cwebp -q 80 image.png -o image2.webp
The structure of the above command is -q is quality 80 is the compression factor -o is used for naming the output file
cwebp [options] input_file -o output_file.webp
There are a lot of [options] that you can do and for the complete list visit the official WebP document.
Convert Webp to PNG
The command for decompressing is below;
dwebp image2.webp -o image3.png
In the above command, I am decompressing the image and -o is for giving the output name as image3.png.
That is how easy it is to convert images from one format to other, if you have followed along you can do the same without compromising your privacy.
Advantages of WebP
Reduction in size: Save more space, I have personally seen a reduction of up to 30% with an 80 compression factor. You can do even more by increasing the level of compression.
Reduces site load time: WebP compresses the images without losing on the quality and that results in better load time.
Positive effect on SEO: Better load time is a ranking factor so WebP will certainly add up to your ranking points.
Consistent image format: Earlier we used jpg for normal images and png for transparent images now just use a single WebP format for both types.
No compromise on the quality: There is a difference between png and jpg quality but with WebP, there is no compromise.
Disadvantages of WebP
There are only two disadvantages that I have come across there might be more but I am sure these will be covered very soon.
Acceptance by browsers: Not all browsers have accepted WebP as a valid image format. Mostly all the major browsers like Chrome, Firefox, Safari, Opera, and Edge do expect but some other small players are yet to follow suit.
Social Meta Tag: Twitter has accepted the WebP format but Facebook is yet to accept it as a valid format. So if you are on WordPress and using WebP format as your title image then when you share it on Facebook, the image will not appear. You can tweak this by loading a png or jpg for social cards.
Conclusion
As much as I love open-source, I hate people who take advantage of a person who is not technically sound. WebP is open-source and yet I see sites that are ready to charge you for using their online tool. Why should I pay when I can do the same on my own computer?
Then there is another issue of privacy what these online converters are doing with your personal images I don't know, they can scrap all the data or sell it, their wish. So, you are I are better off not sharing and doing it ourselves to keep our data and images safe with us.
Lastly use WebP for image optimization, when I checked my site on Gtmetrix and Google Page Speed they always come up saying images can be optimized and this is how you do it.


